
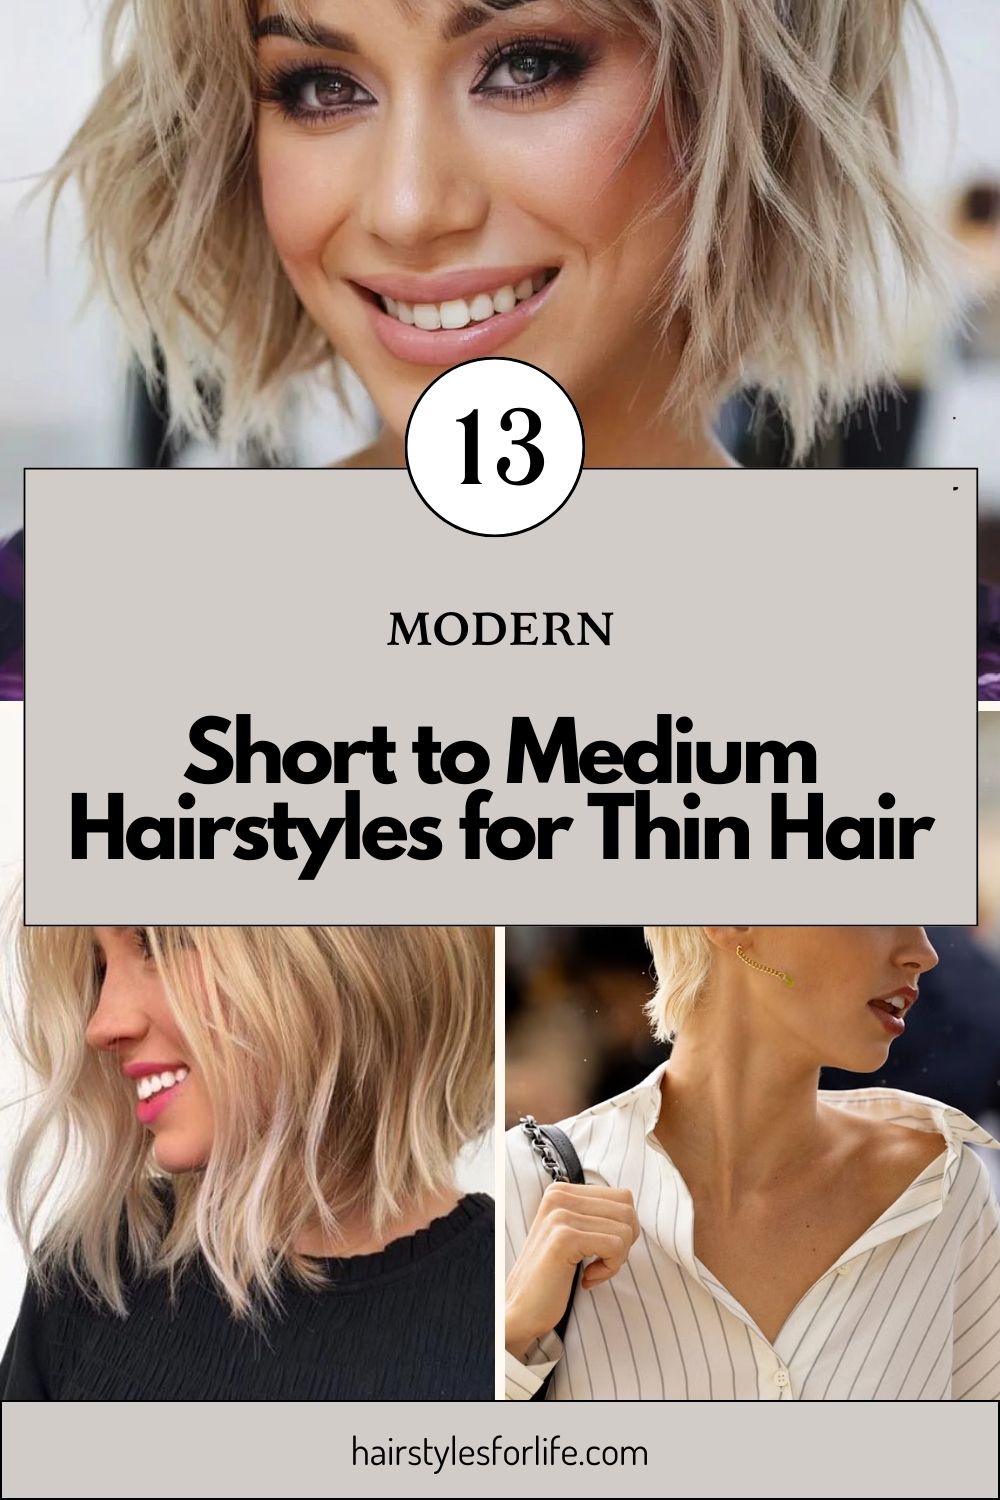
I still remember standing in front of the mirror one rushed morning, hairbrush in hand, wondering why my hair looked so flat no matter what I did. If you’ve got thin hair, you know that feeling. You want style, movement, something—but not the heavy look that drags everything down. It’s frustrating, honestly. And a little exhausting.
That’s exactly why Short to Medium Hairstyles for Thin Hair can feel like such a relief when you finally find the right one. They’re not about hiding your hair or over-styling it. They’re about working with what you have. Ever noticed how some cuts just magically make hair look fuller? Yeah, that’s not luck.
In this article, I’ll walk you through styles that actually add shape, lift, and confidence—without hours of effort. If you’ve been stuck in a haircut rut or scared to try something new, don’t worry. You’re not alone, and you’ve got options. Let’s figure them out together.
Short to Medium Hairstyles for Thin Hair
Short to medium hairstyles for thin hair are perfect for adding volume and shape without heavy styling. These lengths make hair look fuller, healthier, and easier to manage every day.
Classic Bob

Honestly, the classic bob is where I send people first when they tell me their hair feels thin and lifeless. I’ve worn some version of it on and off for years, and every single time I come back to it, I’m reminded why it works. The blunt shape at the bottom gives this instant illusion of thickness, even when your hair really isn’t cooperating. In my opinion, chin to jaw-length is the sweet spot because it keeps the ends looking full instead of wispy. I’ve found that asking my stylist for a slightly beveled edge instead of razor-thin ends makes a huge difference.
What really sold me, though, is how low-effort it can be. On rushed mornings, I just rough-dry it while lifting at the roots with my fingers, and it still looks intentional. To be fair, the cut does the heavy lifting. If you’re trying this, tell your stylist you want weight at the ends and minimal layering. That one sentence alone can save you from the dreaded flat bob regret.
Layered Lob
The layered lob is one of those cuts I didn’t expect to love as much as I do. I tried it during a “grow-out phase,” and somehow it ended up looking better than most of my planned haircuts. The length sits around the collarbone, which already feels forgiving, but the real magic is in the soft layers. I’ve found they add movement without stealing density, which is a fine line with thin hair. In my opinion, long layers only—short layers can backfire fast.
Styling-wise, this cut is surprisingly flexible. Some days I blow-dry it straight with a round brush, and other days I just add loose waves with a curling iron. Either way, it never looks stringy. If you’re considering this, ask your stylist to keep the perimeter strong and layer lightly through the crown. I’ve learned the hard way that too much thinning makes a lob collapse. When done right, it looks effortless and full, even on lazy hair days.
Textured Pixie Cut
I’ll be honest, the textured pixie cut scared me before I actually tried it. Thin hair and super short length sound risky on paper, but in real life, it was oddly freeing. The trick is texture, not tightness. I’ve found that choppy, piecey layers give thin hair this lived-in fullness that sleek pixies just don’t. In my opinion, a pixie should never lie flat; it should look a little messy on purpose.
What I loved most was how fast styling became. A dab of lightweight texturizing cream, a quick finger tousle, and I was done. To be fair, regular trims matter here, or it loses shape quickly. If you’re thinking about it, ask for softness around the crown and avoid heavy undercutting. I’ve seen too many pixies look sparse because too much hair was removed. Done right, it’s bold, flattering, and surprisingly volume-friendly.
Blunt Cut with Soft Ends
This one is for anyone who wants fullness without going super short. A blunt cut with soft ends has been my quiet fallback haircut more times than I can count. The bluntness creates density instantly, while the softened ends keep it from looking harsh or boxy. I’ve found this balance is especially good for thin hair that still wants some flow. In my opinion, completely razor-sharp ends can feel too severe, especially as hair moves.
When I wear this cut, I usually keep it just past the shoulders. It looks polished even when air-dried, which I genuinely appreciate. If you’re trying this style, tell your stylist you want a blunt baseline with just a hint of internal layering. I’ve learned that over-layering ruins the point of this cut. It’s simple, yes, but that’s why it works. Sometimes thin hair just needs structure, not tricks.
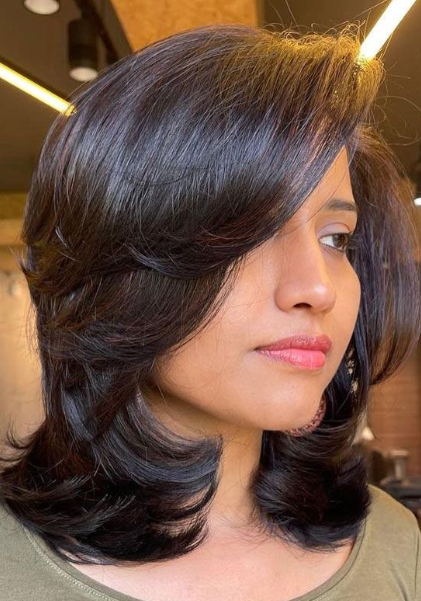
Shoulder-Length Layered Cut
Shoulder-length layered cuts are deceptively tricky, and I know that because I’ve had both amazing and awful versions of it. When it works, it really works. The key, in my experience, is subtle layering that lifts the hair without shredding it. Thin hair needs support, not aggressive shaping. I’ve found that keeping the layers longer around the face helps maintain fullness while still adding movement.
What I like about this length is how adaptable it feels. You can tie it back, curl it, straighten it, and it still holds some body. To be fair, this cut does require a decent blow-dry to shine. I usually flip my head slightly while drying the roots, then smooth the ends. If you’re going for this, be very clear with your stylist about avoiding thinning shears. I’ve learned that lesson the hard way, more than once.
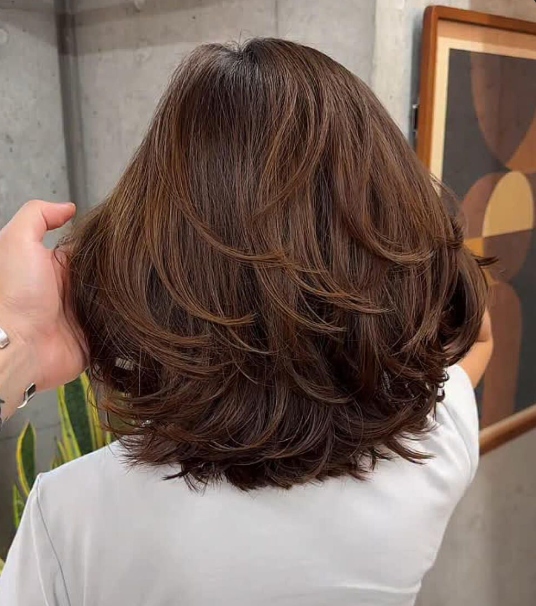
Shaggy Medium Cut
I didn’t think the shaggy medium cut would suit thin hair until I tried a softened version of it. The modern shag isn’t about heavy, rock-star layers anymore, and that’s what makes it work. I’ve found that a gentle shag with light texture around the crown creates this illusion of fullness and movement. In my opinion, it’s one of the best cuts for hair that falls flat but still wants personality.
Styling this cut is actually fun, which I can’t say about every hairstyle. I usually scrunch in a volumizing mousse and let it air-dry, and it somehow looks intentional. To be fair, it’s not a sleek look, but that’s the point. If you’re curious, ask for a “soft shag” and specify that you want fullness, not thinning. I’ve learned that clarity saves a lot of regret in the salon chair.
Asymmetrical Bob
The asymmetrical bob is one of those cuts that quietly fakes volume. I tried it during a phase when my hair felt especially limp, and the uneven lengths made everything look more dynamic. In my experience, asymmetry distracts the eye from thinness and adds a modern edge. I’ve found that keeping one side slightly longer, not dramatically so, makes it wearable without feeling trendy for the sake of it.
What surprised me most was how flattering it felt around the face. The longer side frames the jaw, while the shorter side adds lift. To be fair, this cut needs confidence, but not much styling. A smooth blow-dry or loose waves are enough. If you’re considering it, tell your stylist you want subtle asymmetry and a solid perimeter. I’ve learned that extreme angles can make thin hair look sparse instead of stylish.
Feathered Lob
The feathered lob feels like a quiet nod to older layering techniques, but updated in the best way. I’ve worn this style during transitional hair phases, and it always made my hair feel lighter yet fuller. The feathering adds softness and movement without removing bulk at the ends, which is crucial for thin hair. In my opinion, this cut works best when the layers are blended, not choppy.
Styling-wise, I usually use a round brush and focus on lifting the mid-lengths. It gives that airy, swishy look without needing tons of product. To be fair, feathering can go wrong if it’s overdone. I’ve learned to ask for “light feathering only” and to keep the ends full. If you want a lob that feels feminine and easy without looking flat, this one is quietly reliable.
Side-Parted Medium Cut
A side-parted medium cut sounds basic, but honestly, it’s one of the easiest volume tricks out there. I switched from a middle part to a deep side part once out of boredom, and it completely changed how thick my hair looked. I’ve found that the side part instantly lifts the roots and gives thin hair some attitude. In my opinion, the cut itself doesn’t need to be complicated.
I usually keep this style around shoulder length with minimal layers. The part does most of the work. To be fair, you do need to train your hair a bit by blow-drying in the opposite direction first. If you’re trying this, ask your stylist to cut it with flexibility in the parting. I’ve learned that when a cut locks you into one part, it limits volume options. Simple changes really can matter.
Wispy Bangs with Medium Hair
Wispy bangs with medium hair are something I resisted for years, mostly out of fear. Thin hair and bangs sound like a risky combo, but I was wrong. I’ve found that light, airy bangs can actually make the rest of the hair look fuller by adding interest at the front. In my opinion, the keyword here is wispy, not thick or blunt.
When I tried them, I kept the bangs long enough to blend into the sides. That made styling easier and less commitment-heavy. To be fair, bangs need regular trims, but they’re surprisingly forgiving. I usually style them with a small round brush or even just my fingers. If you’re curious, ask for soft, see-through bangs and avoid heavy density. I’ve learned that restraint is what makes this look flattering on thin hair.
Hair Care Tips for Thin Hair
Thin hair needs gentle care to stay healthy, light, and full of volume. With the right routine and products, short to medium hair can look thicker, shinier, and easier to manage.
-
How often to trim short to medium hair: Trim your hair every 6–8 weeks to remove split ends and keep the shape fresh. Regular trims help thin hair look neat and prevent breakage.
-
Shampoo and conditioner recommendations: Use lightweight, volumizing shampoos and conditioners made for thin or fine hair. Avoid heavy, creamy formulas that can make hair look flat.
-
Avoiding product buildup: Do not use too many styling products at once. Wash hair properly and use a clarifying shampoo once in 2–3 weeks to remove buildup.
-
Heat protection and damage prevention: Always apply a heat protectant before using a dryer or straightener. Keep heat tools on low to medium settings to prevent thinning and damage.

Hi, I’m Anna Spencer, A professional hairstylist based in North Carolina and the creator of Hairstyles for Life. With over a decade of hands-on salon experience, I’ve styled everything from everyday looks to runway-ready transformations. I started this website to share my passion for hair, offer expert tips, and help you feel confident in your personal style no matter your hair type or length. Whether you’re looking for quick tutorials, timeless trends, or honest product advice, you’ll find it all here.